L'interfaccia utente del PLC è fatta con Qt Designer personallizato con i plug-in Sirius_ES
Qt Designer è un tool Qt per il designing e building di interfacce utente grafiche (GUIs) da componenti Qt.
Gli utenti possono comporre e presonalizzare i widget e i dialoghi in modo what-you-see-is-what-you-get (WYSIWYG), e testarle usando diversi stili e risoluzioni.
Per componenti base e aiuto, per favore fai riferimento al sito ufficiale di Qt Designer (QT Reference Documentation).
¶ 1. Personalizzazione Sirius-ES
Qt Designer offre molti componenti standard per creare layout e moduli. Sirius-ES ha creato una serie di widget per avere un interfaccia semplice con le variabili del PLC.
All'interno della cartella del progetto IEC ci sono due sottocartelle: "ui" e "res". Contegono le pagine dell'interfaccia utente (ui) e tutte le risorse di cui hai bisogno (img, ecc...).
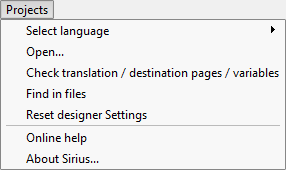
In aggiunta c'è un menù chiamato "Projects" che contiene parti dei tools personalizzati Sirius-ES.
¶ Menù Project
All'interno del menù project sono elencati gli elementi nell'immagine sottostante.
¶ Seleziona lingua
Premilo e seleziona la lingua da mostrare nei moduli. Mostra traduzioni nella pagine nella lingua selezionata. Le traduzioni vanno inserite nel file linguistic.txt.
Se una traduzione è mancante, verrà mostrato il valore di default.
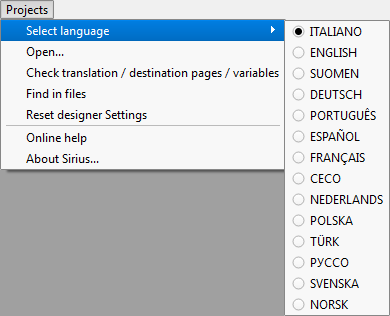
I linguaggi di traduzione sono descritti nel file linguistic.txt (CSV file). Usa il carattere Tab come separatore.
La traduzione può essere gestita con un editor di testo o qualsiasi programma di foglio elettronico.
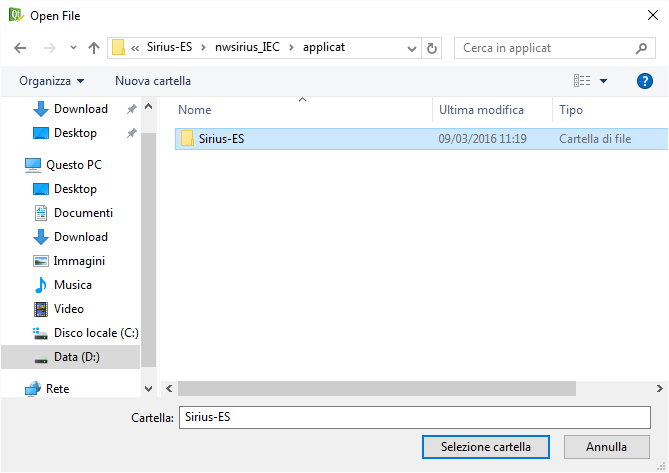
¶ Open...
Apre un progetto Sirius-ES Editor IEC, o un semplice progetto HMI. Selezionando la cartella del progetto, tutti i moduli nella cartella "ui" verranno caricati.
¶ Controlla la traduzione/destinazione pagine/variabili
Fa lo scan di tutti i moduli in ordine per controllare pagine di destinazione o traduzioni mancanti. Il risultato viene salvato nel file “ui/translation_destination.txt”.
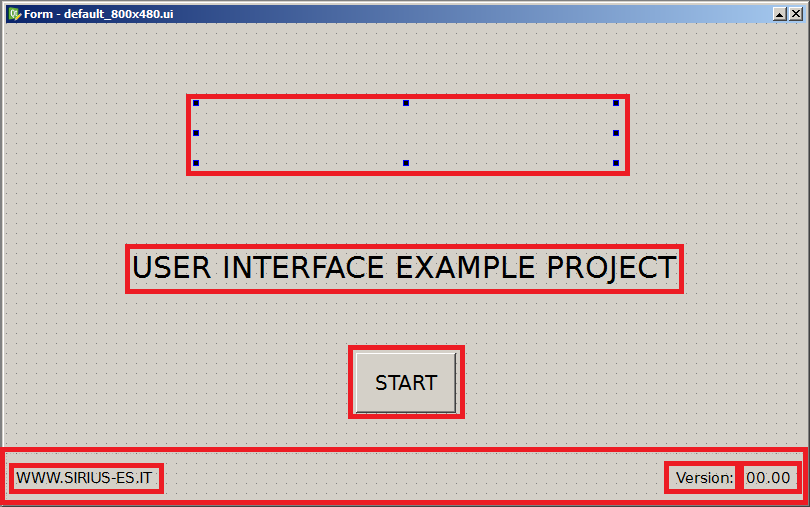
Analyzing file "default_800x480.ui"
Missing translation   for  label     ---> "WWW.SIRIUS-ES.IT"
Missing translation   for  label_2    ---> "Version:"
Missing translation   for  qHmiLabel   ---> "00.00"
Missing translation   for  QHmiLinkPage ---> "START"
Missing translation   for  label_3    ---> "USER INTERFACE EXAMPLE PROJECT"
In questo caso non ci sono traduzioni, sono segnate in fill.
¶ trova in file
//TO BE DEFINED
¶ Reset designer Settings
Ritorna alle posizioni e condizioni iniziali, in tutti i pannelli del Designer. Il Designer va riavviato.
¶ Online help
Link a questo sito.
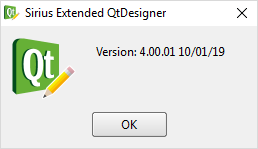
¶ About Sirius...
Versione e data di rilascio della personalizzazione del Designer.
¶ Componenti personalizzati
Se il progetto aperto è un file Sirius-ES IEC xml, il Designer cerca e carica il file variables_list.txt.
Contiene tutte le variabili del PLC da usare in HMI, per associare pulsanti, campi ed etichette. Doppio click sul nome della variabile per copiarlo negli appunti e incollarlo nel widget.
E' possibile fare drag & drop del variabili nel widget per assegnarle.
Se il progetto è solo un HMI, il file variables_list.txt non è presente perche viene creato dall'IEC Editor. E' possibile creare il variables_list.alias per didirezionare indirizzi di memoria (IE: %MD1234) a una nomenclatura più utile. Il sistema carica il file e mostra gli alias invece che le variabili.
Il file dev'essere creato in un text editor con il formato:
- ALIAS "SPACE" ADDRESS(:DECIMAL)(@DATA TYPE)
IE:
- variableAlias1 %MW1000
- variableAlias2 %MW1000:0.1
- variableAlias3 %MW1000@INT
- variableAlias4 %MW1000:0.1@INT
Se il data type non è specifiacto il base type sarà BYTE (%MB), WORD (%MW) o DWORD (%MD)
Quando le variabile vengono cambiate nell'IEC Editor, ricorda di salvare e buildare il progetto, in modo da ricaricare la lista delle variabili.
Per semplificare la creazione dell'interfaccia e la comunicazione con il PLC, Sirius-ES ha aggiunto una serie di componenti personalizzati. Sono listati nella pagina Widget nella sezione Sirius HMI Widget.
Estendono i QT windet con alcune proprietà come fieldName (link alla variabile PLC) per mostrare i valori delle variabili, o impostarne dei valori; c'è anche la possibilità di configurare un widget multi-lingua.
Tutti i componenti Sirius-ES sono creati per un uso semplice con le variabili del PLC. Contengono una sezione proprietà per mappare variabili e modificare lo stile dei componenti.
Se il widget non richede una variabile (fieldName o stateField), è consigliato utilizzare i widget standard QT per performance migliori (minore uso della CPU).
{.is-info}
Ogni componente personalizzato può avere diverse proprietà da impostare.
Proprietà personalizzate comuni posso essere raggruppati in una sezione con il nome del widget type.
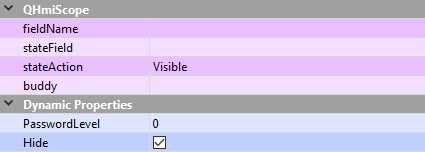
FieldName è una proprietà comune usata per associare la variabile del PLC al widget.
StateField è usata per controllare la condizione del widget, E' un valore booleano che aziona il campo stateAction.
StateAction indica al sistema cosa fare quando stateField è impostato come true. Può essere impostato a Visible o Enable.
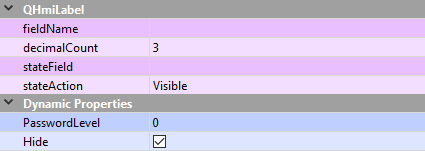
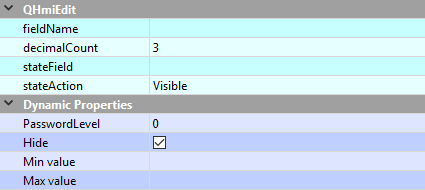
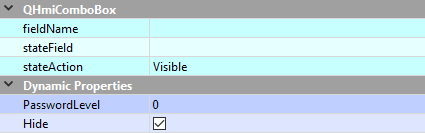
¶ Dynamic Properties
I campi personalizzati nella sezione Dynamic Properties vengono usati per fare il profiling dell'interfaccia.
"PasswordLevel" indica al sistema se il widget può essere usato solo con lo stesso livello o superiore.
"Hide" descrive il funzionamento del widget: se spuntata, può essere o meno visibile agli utenti, se non spuntata può essere abilitata o disabilitata per l'utente corrente.
Dynamic Properties è una personalizzazione aggiunta a tutti i widget di Qt Designer.

¶ QHmiLabel
Usato per mostrare a schermo il valore di una variabile.
Il Decimal count indica il numero di cifre decimale da mostrare (se la variabile è un numero).
¶ QHmiEdit
usato per modificare i valori delle variabili. Come QHmiLabel può mostrare un valore decimale fisso.
Ha anche due Dynamic properties per impostare il valore min e max (se è un numero). Quando viene inserito un nuovo valore, dev'essere nel range min/max, altri valori non sono permessi.
¶ QHmiComboBox
Usata per scegliere in una serie di valori.
Per definire gli elementi della casella combinata, right click sul widget e seleziona "Edit Items...".
Premi sul pulsante "+" per aggiungere un nuovo elemento. "-" per rimuovere l'oggetto selezionato dalla lista. Le frecce sono usate per cambiare l'ordine degli elementi.
Se Translatable properties è spuntata, la descrizione dell'oggetto viene presa dal file linguistic. La descrizione degli elementi è la chiave di traduzione.
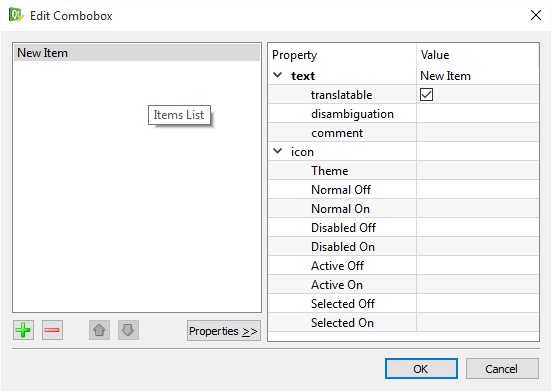
Fieldname è un numero intero variabile per corrispondere allo stesso indice.
¶ QHmiLinkPage
E' usato per chiamare altre pagine sul PLC (come un link HTML).
La pagina di destinazione è la pagina che viene caricata quando premuto.
L'azione può essere impostata a JumpOnly e JumoAndDestroy. La prima carica la pagina selezionata e tiene in memoria il render grafico della pagina corrente, la seconda carica la pagina selezionata e rimuova dalla memoria la pagina corrente. In qualunque caso, lo stato variabili è rimosso dalla memoria (la cache di sistema mantiene solo il render grafico quando viene effettuato il jump).
Inoltre presenta una dynamic property per impostare l'allineamento del testo nel pulsante (default: al centro)
La pagina di destinazione può essere impostata con il drag&drop del nome della pagina sul widget.
Le pagine di sistema possono essere linkate: le destinazioni sono listate nel pannello GUI Forms.
| Internal Pages links |
|---|
| @ApplicationVariables |
| @Account |
| @DateAndTime |
| @Informations |
| @InternationalSettings |
| @NetworkPreference |
| @Monitor |
| @ValuesHandler |
| @Devices |
Tutte le pagine sono protette da password.
Login link:
@Login
Una volta loggato, se l'user level >= 7, il menù di sistema appare.
¶ QHmiButton
Usato per cambiare lo stato delle variabili booleane.
La dynamic property "Align Left" è usato per impostare l'allineamento del testo nel pulsante (default: al centro).
¶ QHmiLcd
Funziona come una QHmiLabel ma con layout differenti, Usato per mostrare solo valori numerici.
Mostra il numero come un display a 7 segmenti.
¶ QHmiSetWidgetState
Imposta i valori delle variabili del PLC. usato in combinazione con pulsanti e qualsiasi widget può essere modificato.
IE: QPushButton connesso a QHmiSetWidgetState è l'equivalente di un pulsante Sirius QHMI.
Il segnale QPushButton clicked(bool) imposta lo stato alla variabile associata a QHmiSetWidgetState nello slot set_value(bool).
Il segnale QLineEdit textEdited(QString) collegato allo slot set_value(QString) è l'equivalente del widget QHmiEdit.
¶ QHmiMovie
Usato per mostrare un'immagine animata (formato GIF). Con questo widget calibri e barre di progresso possono essere creati con un layout specifico.
Movie name è il file da caricare.
Frame Number è il numero di frame da mostrare.
Fieldname è la variabile del PLC con l'indice frame corrente.
Per esempio questa immagine può essere unata per monitorare qualsiasi valore come Volt, Ampere ecc... Premi sull'immagine sottostante per mostrare l'animazione.

¶ QHmiWorkRecipe
Le Recipes sono usate per salvare e caricare le configurazione del PLC.
In ogni ricetta può essere salvato un set di varibili con il loro valori e caricato, in modo da configurare il PLC.
I dati verrano salvati con il formato NAME "space" VALUE.
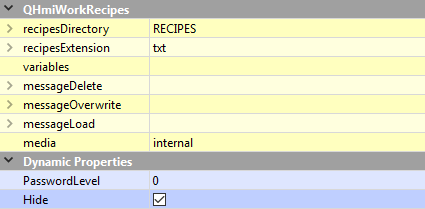
L'utente può impostare la directory, file extension e media device per immagazzinare dati delle Recipes,
Il campo Variabili contiene la lista variabili per salvare/recuperare i valori.
I campi di messaggio sono le stringhe usate per confermare i pop-up.
Vedi l'esempio "Recipes" per vedere come configurare e lavorare con le recipes.
¶ QHmiStackedWidget
Usato per mostrare diverse pagine in un modulo.
Field name indica al widget quale pagina mostrare (page index) Il cambiamento della pagina può essere fatto con due QPushButton (previous e Next) collegati dal segnale clicked() agli slot slideInNext() e slideInPrev().

Per inserire pagine right click sul componente e premi "Insert page" dal menù contestuale. Lascia fli oggetti nella pagina interna (QWidget) per crearle.
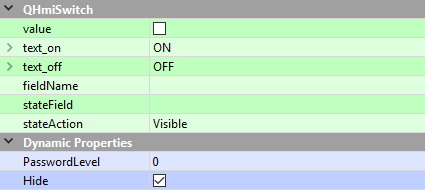
¶ QHmiSwitch
Imposta una variabile a ON o OFF. Value rappresenta il valore di default.
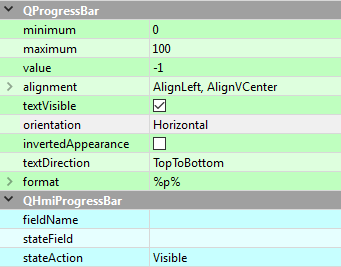
¶ QHmiProgressBar
Usato per mostrare i progressi del lavoro, La variabile del PLC imposta il valore tra minimo e massimo.
¶ QHmiPreviewTable
Il widget è usato per selezionare alcune forme già caricate o caricare file dxf per lavori cnc.
Il widget carica file extension DXF, CNC, TAP che si trovano nella cartella /SiriusApplicat/DATA/drawings del PLC (o PC per la simulazione).
Altri file type possono essere specificati dalla proprietà extensions, selezionando la proprietà e premendo Change String list.. Poi inserisci la nuova file extension senza *. (solo il type). La list è case sensitive.
I file nella cartella sono mostrati nel widget come lista preview.
Una volta selezionata una forma, il sistema manda un segnale allo slot connesso.
CN or TAP files: il sistema può mandare solo il filename selezionato. I valori defaultFeedRate sono all'interno del file.
DXF files: la proprietà defaultFeedRate dev'essere impostata con la REAL variable del PLC, in modo da conoscere la velocità di lavoro.
Se non impostata (o 0) il lavoro non può iniziare (velocità è 0).
Il file selezionato viene convertito in un file cn (con istruzioni G-Code). Poi il filename viene emesso allo slot connesso.
Il file generato è posizionato nella stessa cartella del source file.
Nello slot connesso, se il source file è su un dispositivo usb, è consigliato farne una copia locale in /SiriusAppllicat/DATA per sicura analisi e lavorazione.
La stringa ricevuta (con filename) dev'essere scritto in una stringa variabile del PLC, poi avvia il function block CNC_parser.
PLC CODE:
CNC_PARSER.FILENAME := "value from javascript";
CNC_EXECUTE := TRUE;
Ora l'analisi del file cn ha inizio; il risultato è un file binario precompilato.
Guarda il blocco funzione CNC_PARSER nell'IEC editor block.
Se CNC_PARSER.DEFAULTVEL non è impostato dal file cn defaultFeedRate property, è possibile impostare un nuovo valore dal codice.
CNC_PARSER.DEFAULTOFFSET è il tool di riferimento per l'offset dell'asse Z.
CNC_PARSER.DEFAULDIAMETER è usato per la compensazione dei tool.
CNC_PARSER.IJKRELATIVE è usato per calcolare cerchi e archi, fai riferimento a CNC COOKBOOK.
CNC_PARSER.DISTANCEMODERELATIVE indica di usare G90 (false) o G91 (true)
CNC_PARSER.REF TO TABLE è usato per specificare la tabella dei tools. Vedi IEC BUILT IN DATA TYPES.
Per la lista di comandi G perfavore fai riferimento a:Wikipedia G-Code page.
CNC_PARSER ha questi output:
DONE: conversazione finita.
BUSY: operazione in corso.
ERROR: vera se si è verificato un errore.
ERRORID: codice di errore.
ERRORSTR: descrizione dell'errore.
PERCENT: indicatore progresso di conversione (IE: usato per riempire QHMIProgressBar).
Il file binario prodotto è cnc.bin..
Una volta che la conversione è terminata senza errori, il file di output viene usato con il function block CNC_READFILE.
CNC_READFILE.FILENAME = il nome originale del file selezionato da QHMIPreviewTable ("value from javascript").
CNC_READFILE.EXECUTE avvia il function block.
CNC_READFILE.DISPLACEORIGN true per tradurre in 0,0 l'intero progetto.
CNC_READFILE ref to LINEINFO usa array di cnc_line_info per riempire linee di lavoro dal binario. Vedi IEC BUILT IN DATA TYPES.
Parametri di output sono DONE, BUSY, ERROR, ERRORID, ERRORSTR.
CNC_READFILE.LOWBOUND sono le coordinate di fondo della draw.
CNC_READFILE.HIGHBOUND sono le coordinate di cima della draw.
Se DISPLACEORIGIN è impostato come TRUE, LOWBOUND è sempre 0.
CNC_READFILE LINEINFO_LEN è il numero di comandi. E'la lunghezza dell'array LINEINFO.
CNC_READFILE READED è un contatore di calling funtion block. Usato per funzione di debug.
CNC_READFILE PERCENT è il progresso della lettura, indicatore di progresso (IE: usato per riempire QHMIProgressBar).
Una volta completato il processo, l'array LINEINFO viene caricato con tutti i comandi da eseguire.
Per farelo scale dell'array LINEINFO, usa il blocco funzione CNC_SCALE.
CNC_ROTATE ruota i campi dell'array LINEINFO con l'angolo dato.
CNC_TRASLATE, muovi l'array LINEINFO con il dato parametro di input TRASLATE_TO.
CNC_GETLINESTRING ottieni la linea selezionata dell'array LINEINFO come stringa.
CNC_GETLINEINFO fill a lineinfo structure ref to, with the lineinfo array specified line. like a get(i) element.
CNC_EXECUTE
INPUT
RESET (bool): reinizializza il processo (imposta linea 0 dell'array LINEINFO).
EXECUTE (bool): inizia il processo dalla linea corrente.
AXIS(array of int): inizializza gli assi in uso.
STOP (bool): mette in pausa il processo corrente.
LINEINFO (ref to): il processo da eseguire.
LINEINFO_LENGTH(DINT) linea totale di processo.
RAPID_REV (bool): ritorna al percorso tool.
RAPID_FOW (bool): segue il percorso tool.
STEP_BY_STEP(bool): avvia un singolo comando, poi ferma il processo.
STEP_DELAY(UINT): pausa da uno STEP all'altro in millisecondi.
MAX_CENTRIPET_ACC (real) accelerazione centripeta massima.
MAX_SPEED(real) velocità di progetto massima.
ACCELERATION (real)
DECELERATION (real)
SPEED_OVERRIDE (real) forza la velocità reale.
RAPID_SPEED (real) usato dal G00 code transfer.
CURVEDIVISION (real) distanza dai punti usata per disegnare cerchi (mm).
BLEND_PATTERN (bool) : impostata come vera di default, usata per mischiare cambi di direzione repentini.
SAVE_POINT (bool): Se true salva il percorso di lavoro corrente come gcode per il debug. Il risultato è nel file into /tmp/savedpoints.cnc.
OUTPUT
INTERPOLATING (bool): indica se è in movimento o meno.
CNC_EXECUTE.ACTPOS posizione dell'asse corrente. All'inizio ci va caricata la posizione reale degli assi.
When interpolating is true, the function block generate a virtual position to give as input to the corresponding axes. Quando INTERPOLATING è true, il function block genera una posizione virtuale da dare come input all'asse corrispondente.
AXIS_REF.ACTSPA := CNC_EXECUTE.ACTPOS[i], dove i è l'asse corrente.
0 -> X axes
1 -> Y axes
2 -> Z axes
3 -> A axes
4 -> B axes
5 -> C axes
6 -> U axes
7 -> V axes
8 -> W axes
GROUP_STATE (GROUP_STT enum) è lo stato di lavoro: fa riferimento al data type built in di GROUP_STT.
Se lo stato è NEED_RESET, è necessario un comando di reset.
CNC_STATE (CNC_STT enum): fa riferimneto al data type built in di CNC_STT.: fa
CURRENT_SPEED (real) velocità reale dell'interpolator.
SPACE_DONE(real): distanza percorsa dall'inizio alla posizione attuale.
SPACE_LEFT(real): distanza rimasta da fare.
ACTIVE (bool): se è true il sistema sta funzionando.
STOPPING (bool): fermando il lavoro corrente.
GCODELINE (DINT) linea di comando corrente dell'array LINEINFO.
ACTUAL_SPINDLE_SPEED (real): velocità tool.
EXTGCODENEED (bool): se è true è necessaria un'operazione esterna (IE: turn on/off tool)
refer to the example project.... <---- TODO ---->
INPUT/OUTPUT
EXTGCODEDONE(bool): risposta da una richiesta gcode esterna (EXTGCODENEED) se vero la funzione imposta come false EXTGCODENEEDandEXTGCODEDONE, poi prosegue il lavoro.
Parametri non descritti non vengono usati.
¶ QHmiCncWork
E' usato per vedere la bounding box dei lavori cnc. Carica la preview generata con il function block CNC_PARSER.
Emette peso e altezza della bounding box che può essere connesso ad etichette per mostrare dati.
Gli slot input possono essere connessi ai pulsanti signal/slot.
Gli input sono:
ZOOM IN (bool)
ZOOM OUT(bool)
ZOOM ALL(bool)
SET_SHOW_BOUND(bool)
SET_AUTO_PAN(bool)
Le proprietà dinamiche possono essere riempite con le variabili del PLC per mostrare dati del lavoro corrente.
ON_WORK: CNC execute variable
GCODELINE: linea corrente di esecuzione
DRAWNAME: file caricato
TOOLDIAMETER: tool diametro
TOOLCUTTING: cutting reale o no
SHOWREALWORK: mostra percorso di cutting reale, usato per il debug working
ABSPOSX: posizione X reale
ABSPOSY: posizione Y reale
POSROT: mostra orientamento del cutter
POSRVX: min X bound
POSRVY min Y bound
POSFWX max X bound
POSFWY max Y bound
ROTATION: ruota di gradi specificati la preview (solo preview)
WORKING imposta come true per mostrare la barra di progresso circolare del widget
WORKINGPERCENT: valore della barra di progresso circolare del widget
RELOAD: contatore del lavoro ricaricato, se cambiato, aggiorna la preview.
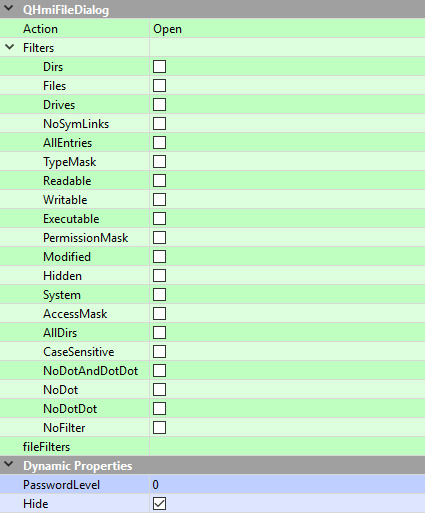
QHmiFileDialog
Apre un modulo popup per scegliere un file. Una volat selezionato restituisce l'intero filename all'ui. (percorso + nome)
Collega il segnale di un QPushButton clicked() a un open_dialog_slot() per aprirlo.
Collega il segnale di open_dialog_file_signal(QString) a uno slot QLabel setText(QString) (or else) per mostrare il nome del file selezionato.
File, cartelle e drive possono essere filtrate impostando le proprietà del widget.
L'azione può essere impostata per Open, Rename o Remove.
¶ QHmiPreviewPixmap
Usa to per analizzare file DXF, CNC o NC. Nessuna proprietà viene aggiunta a questo widget.
Collega il segnale di un widget con testo (QString) a uno slot set_file_slot(QString) di questo widget per caricare il file.
Può essere connessoa un QHmiFileDialog per scegliere un file e mostrarlo.
Per mostrare la preview connetti il suo segnale set_pixmap_signal(QPixmap) a uno slot QLabel setPixmap(QPixmap).
L'etichetta imposta la propria immagine di background con la preview generata.
Vedi l'immagine di esempio dxf.ui del progetto di esempio Sirius-ES.
E' utlizzato solo per preview. Non ordina segmenti e archi per lavori CNC.
Per farlo, usa QHmiPreviewTable.
¶ QHmiScope
Usato per mostrare il valore di una variabile come un oscilloscopio. imposta il filedName con la variabile da mostrare.
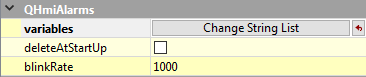
¶ QHmiAlarms
Per una facile configurazione di allarmi il widget QHmiAlarms può essere usato all'interno dei moduli
Accenta una lista di variabili booleane che indicano al sistema quale allarme è abilitato o meno.
Ogni allarme può essere configurato con messaggi, colori e altre proprietà in modo da personalizzare l'applicazione.
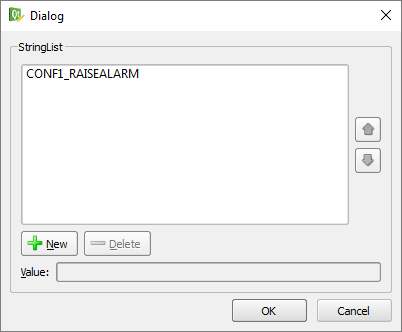
Premendo sul pulsante Change String List, un pop-up viene mostrato per aggiungere le variabili degli allarmi.
Poi premi New e scrivi il nome della variabile dell'allarme.

Se la stringa inserita non corrisponde con variabili o alias, si verifica un errore.
Per modificare le proprietà dell'allarme, right click sul widget e scegli Alarm properties.
Una tabella mostra le proprietà di ogni allarme.
Description: messaggio di allarme (traducibile con il file linguistico)
Variable: la variabile per controllare l'allarme selezionato.
BackGround: colore di background del pop-up di allarme.
ForeGround: colore di foreground del pop-up di allarme.
AutoRemove: resetta l'allarme alla condizione iniziale (vedi truth level).
AutoHide: rimuovi l'allarme automaticamente sul PLC.
PopUp: mostra l'allarme in una finestra PopUp.
Log: salva l'allarme nel file alarms.log.
Table: mostra l'allarme nella tabella widget di QHmiAlarms.
Truth level: imposta gli allarmi sul rising o sul falling del trigger della variabile.
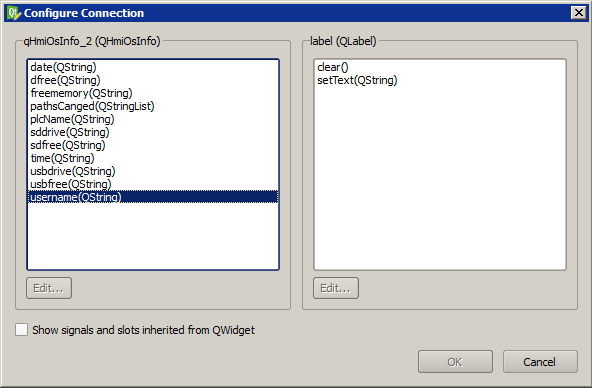
¶ QHmiOsInfo
Usato per ottenere informazioni sull'OS. Nessuna proprietà viene aggiunta a questo widget.
Per usarlo collega il segnale dell'informazione desiderata.
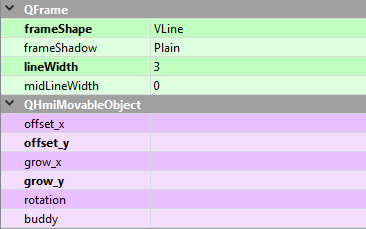
¶ QHmiMovableObject
Used to drow on screen object that can be moved, resized or rotated.
Variables attached to offsets, rowths or rotation set dimensions/position of the object on screen.
Frame shape is the type of object.
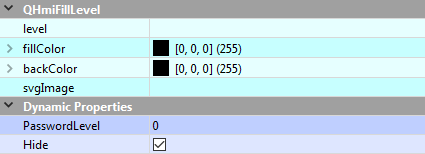
¶ QHmiFillLevel
Questo widget viene usato per mostrare un area con colore differente basato sul valore della variabile "level".
Necessita di un'immagine, un colore di background e un colore di riempimento. Rimpiazza il colore di background con il colore di riempimento dal fondo (livello 0) fino a valore livello.
Il valore è la percentuale di riempimento: da 0 a 100.
NOTE: TUTTI i pixel dell'immagine con il colore di background saranno rimpiazzati. Questo significa che l'immagine può essere disegnata con aree di colore sbagliate.
NOTE: L'immagine deve avere un bordo di un colore diverso dallo sfondo. In caso contrario il colore di riempimento non funzionerà.
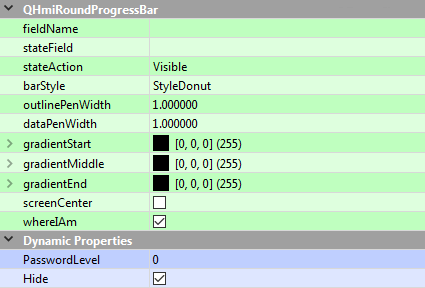
¶ QHmiRoundProgressBar
Mostra il progresso come la QHmiProgressBar lineare ma con un layout diverso. Può essere usato per mostrare dati come calibri o strumenti di misura.
Diversi stili possono essere scelti e gradienti di colore possono essere impostati.
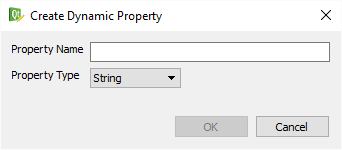
¶ Custom properties
Se un componente necessita di proprietà personalizzata, può essere aggiunta premendo il pulsante "Add dynamic property".
Selezionando "Other" dal menù contestuale, un pop-up viene mostrato:
Poi seleziona nome e tipo; poi premi OK, la nuova proprietà viene aggiunta al widget e diventa accessibile da javascript.
¶ 2. Signals and Slots
Alcune azioni dei widget possono essere aggiunte ad altri widget per fare qualcosa.
L'azione di un widget è il segnale emesso.
Il widget ricevitore ha diversi slot per il segnale.
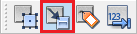
Per attivare la connessione tra widget (operazione di collegamento) ci sono pulsanti specifici nella toolbar che cambiano il designer da modalità edit a modalità wire.
Premendolo il designer cambia in modalità wire. Le pagine mostrano la connessione tra widget con segnali e slot selezionati.
Qualsiasi widget hanno segnali e slot.
Per collegare premi senza rilasciare il pulsante sulla source e muovi il mouse sul widget di destinazione. Su di esso, rilascia il pulsante del mouse. Un pop-up apparirà dove scegliere il segnale source e lo slot di destinazione.
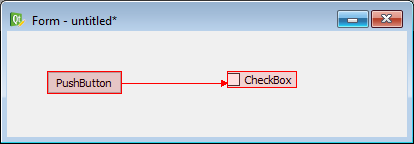
Per esempio un QPushButton può essere collegato a un QCheckBox:
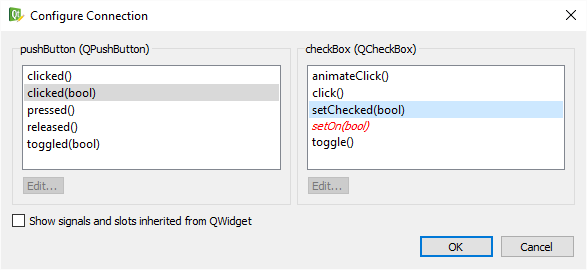

A runitme quando il pulsante viene premuto, nella checkbox sarà spuntato o meno.
Il collegamento dei componenti può essere fatto anche dal segnale di un widget da una funzione javascript.
Nel file javascript, nella funziona register, l'utente può scrivere la connessione dal segnale al codice.
Se un connect è definito nel function register, il disconnect corrispondente dev'essere scritto nel function unregister.
Il sistma aggiunge sempre uno slot connect, il connect precedente non viene sostituito ma continua a funzioanre.
Quando il disconnect chiama, lo slot viene cancellato quando si lascia la pagina.
function the_function_to_call(value) {
  //value type is the same of calling signal...
  //write code here...
}

function register() {
  //APPEND a javascript function to the widget signal
  the_widget["clicked(bool)"].connect(the_function_to_call);
}

function unregister() {
  //remove the function from the signal when the page is leaved for another one
  the_widget["clicked(bool)"].disconnect(the_function_to_call);
}
¶ 3. Javascript
In qualsiasi forma, azioni e impostazioni possono essere fatte con JavaScript.
Per aggiungere un file javascript per formare il modulo, right click sul filename del modulo nel pannello GUI Forms.
I file javascript hanno lo stesso nome del modulo ma con js come estensione. Solo un file per modulo viene creato.
Se il file javascript è presente, nel pannello "GUI Forms", sulla destra del nome del modulo, viene mostrato " (js)".
Al runtime, il sistema controlla se il file esiste; poi il file viene caricato e il codice eseguito.
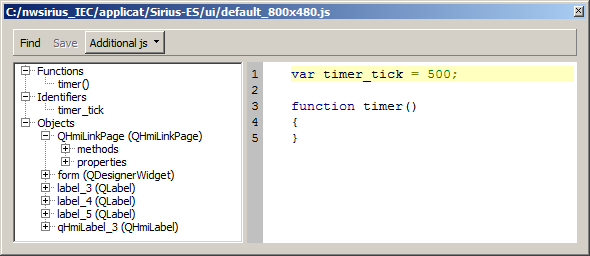
Premendo su Add/Edit javascript l'editor viene aperto. COntiene la struttura dei file sulla sinistra e il text editor sulla destra. I pulsanti per trovare/sostituire a esalvare sono nell'angolo in alto a sinistra.
Il drop-down "Additional js” viene usato per modificare il file di sistema system.js e quello specificato con la variabile include. Se il modulo non ha un file JavaScript associato, il sistema caricherà un file template, con funzioni di sistema vuote.
Nel pannello sinistro, "Functions" contiene tutte le funzioni scritte. Gli Identifiers sono le variabili Javascript. Gli Objects rappresentano la lista widget del modulo con i loro metodi e proprietà.
Il file system.js è un file javascript speciale che funziona indipendentemente dalle pagine. Viene caricato quando l'applicazione viene avviata e viene eseguito in background. Questo file è l'unico che può implementare la funzione on_change_form(). Può essere usato per le task programmate.
¶ Variabili
Le variabili possono essere dichiarate nel codice con la keyword “var”. Il data type viene definito dall'inizializzazione della variabile. Ci sono due variabili riservate usate nel codice: "timer_tick" e "include".
La variabile timer_tick rappresenta il millisecondo utilizzato per temporizzare la chiamata del function timer(); la variabile "include" indica al sistema quale file JavaScript dev'essere incluso in questa pagina.
Solo un file può essere inluso per pagina. Se un file viene incluso, può essere modificate dal drop-down "Additional js".
var timer_tick = 500;
var include = "fileToInclude.js";
var example1 = "string variable"; // STRING
var example2 = new String(); // another STRING
var example3 = 10; // INT
var example4 = 0.5; // FLOAT
var example5 = []; // ARRAY
var example6 = new Object(); // GENERIC OBJECT`
¶ gestione delle varaibili globali
Il lifecycle delle variabili è limitato alla pagina. Quando la pagina viene caricata le variabili vengono inizializzate condichiarazioni o all'interno del register function. Quando la pagina viene lasciara, i dati andranno persi.
Per salvare lo stato delle variabili o usarle tra le pagine, i valori possono essere salvati usando la funzione guiInterface.
I valori sono tutti stringhe. L'utente deve conoscere il type per lanciarli.
I valori possono essere salvati, recuperati o cancellati.
// add a global variablle named "GLOBAL_NAME" with value "GLOBAL_VALUE"
guiInterface("setglobal", "GLOBAL_NAME", GLOBAL_VALUE);

// retrieve the "GLOBAL_NAME" value
var value = guiInterface("getglobal", "GLOBAL_NAME");

// remove from global the "GLOBAL_NAME" variable
guiInterface("removeglobal", "GLOBAL_NAME");

// remove all the variables with name that starts with "GLOBAL_"
guiInterface("removeglobal", "GLOBAL_*);`
¶ Funzioni
Le funzioni JavaScript vengono dichiarati con la keyword “function”. I type di Input e Output sono definiti dal data type della variabile usata per i parametri di input e output. Ci sono quattro funzioni definite dal sistema; il file system.js aveva 5 funzioni;
Function register() viene chiamata quando il modulo viene caricato, Function timer() viene chiamata ad ogni intervallo “timer_tick” in millisecondi. Se questa variabile non è definita, il valore di default è 100ms. Il valore minimo accettato è 20 ms.
Function unregister() viene chiamata prima che il modulo venga scaricato (IE: fa il jump a un altro modulo).
Quando il valore di una variabile di un modulo viene cambiata dal PLC, la function values_changed(vars, changed) viene invocata.
“on_change_form()” è solo dal system.js. Viene invocata quando l'interfaccia utente cambia da un modulo all'altro.
function register(path) {
  //executed after page load
}

function timer() {
  //executed by timer_tick interval ( default = 100 ms, minimum value = 20 ms)
}

function unregister(path) {
  //executed after page unload
}

function values_changed(vars, changed) {
  //executed when a variable value is changed by PLC
  //vars is the array of all varibales
  //changed is the array of only changed vars
}

/* only for system. j s */
function on_change_form() {
  //executed when the system switch from a form to another
}
Quando la funzione values_changed viene invocata, è possibile sapere quale variabile viene cambiata testandola nell'array changed.
function values_changed(vars, changed) {
  //if the TEST_VAR is present in changed array
  if (typeof changed["TEST_VAR"] != "undefined") {
    //read the variable's value
    var value = changed["TEST_VAR"];
  }
}
¶ Function guiInterface
guiInterface è una funzione speciale sviluppata per usare componenti QT in javascript e system functions.
Il primo parametro in questa funzione identifica il tipo di interfaccia e il comando da chiamare:
guiInterface("TYPE::COMMAND", ...........);
¶ variabili di interfaccia
Usato per leggere e scrivere variabili del PLC dal codice javascript. Qualsiasi variabile va registrata nel function register.
function register(path)`
{
  guiInterface("vars::add_variable","VARIABLE_NAME");
}
Quando il codice viene eseguito, la variabile è pronta per qualsiasi operazione:
//reading variables value`
var stringValue = guiInterface("vars::string_value_read", "VARIABLE_NAME");
var boolValue = guiInterface("vars::bool_value_read", "VARIABLE_NAME");
var intValue = guiInterface("vars::number_value_read", "VARIABLE_NAME");
var floatValue = guiInterface("vars::double_value_read", "VARIABLE_NAME");

//writing variables value
guiInterface("vars::string_value_write", "VARIABLE_NAME", stringValue);
guiInterface("vars::bool_value_write", "VARIABLE_NAME", boolValue);
guiInterface("vars::number_value_write", "VARIABLE_NAME", intValue);
guiInterface("vars::double_value_write", "VARIABLE_NAME", floatValue);
¶ Directory interface
Usato per eseguire operazioni sulle directory del disco.
//Getting the last error string
var error = guiInterface("QDir::errno");
//Directory operations (all return boolean value)
var result =guiInterface("QDir::mkdir", dir_name);
var result =guiInterface("QDir::exist", dir_name);
var result =guiInterface("QDir::remove", dir_name);
var result =guiInterface("QDir::rename", dir_name);
var result =guiInterface("QDir::rmdir", dir_name);

//Path operations
//getCurrent path
var path = guiInterface("QDir::currentpath");

//get tmp path
var tmpPath = guiInterface("QDir::tempPath");

//set path with dir_name, retuns true/false as result
var result = guiInterface("QDir::setPath", dir_name);

//create directory dir_name and any previous missing folder, retuns true/false as result
var result = guiInterface("QDir::mkpath", dir_name)

//delete folder dir_name and all previous if empty, retuns true/false as result
var result = guiInterface("QDir::rmpath", dir_name);

//directory content
guiInterface("QDir::entryList", dir_name [,namefilters] [,filters]);

//example
var fileList = guiInterface("QDir::entryList", filepath, "*.csv|*.txt", Files|Dirs);

//dir_name is a string
//namefilters is a string. IE: "*.dxf|*.txt"
//filters, integer Dirs|Files|... see QT documentation
¶ interfaccia per i file
Per lavorare con i file devono prima essere registrati:
var file_descriptor = guiInterface("QFile::register", filename);
filename è il percorso completo del file. Una volta registrato le operazioni sul file sono permesse.
Quando le operazioni sono terminate, una unregister function per rilasciarlo.
guiInterface("QFile::unregister", file_descriptor);

//file errors
var error = guiInterface("QFile::errorString");
var error = guiInterface("QFile::errno");
var result = guiInterface("QFile::exists", name);
var result = guiInterface("QFile::open", file_descriptor, flags);

//flags = ReadOnly,WriteOnly,ReadWrite,Append,Truncate,Text,Unbuffered can be in OR
var result = guiInterface("QFile::close", file_descriptor);
var result = guiInterface("QFile::copy", name);
var result = guiInterface("QFile::remove");
var result = guiInterface("QFile::rename", new_name);
var result = guiInterface("QFile::atend", file_descriptor); //true if EOF
var pos = guiInterface("QFile::pos", file_descriptor);
var result = guiInterface("QFile::seek", file_descriptor, pos);
var size = guiInterface("QFile::size", file_descriptor);
var bytes = guiInterface("QFile::read", file_descriptor, n_byte); //returns a byte array
var bytes = guiInterface("QFile::readall", file_descriptor);
var stringLine = guiInterface("QFile::readline", file_descriptor);
guiInterface("QFile::writeline", file_descriptor, string); //append \n and the end of string
¶ File/Dir information interface
Ottieni informazioni circa il file, directories e percorsi. (vedi documentazione QT QFileInfo).
var result = guiInterface("QFileInfo::absoluteFilePath", file_path);
var result = guiInterface("QFileInfo::absolutePath", file_path);
var result = guiInterface("QFileInfo::canonicalFilePath", file_path);
var result = guiInterface("QFileInfo::filePath", file_path);
var result = guiInterface("QFileInfo::path", file_path);
var result = guiInterface("QFileInfo::baseName", file_path);
var result = guiInterface("QFileInfo::completeBaseName", file_path);
var result = guiInterface("QFileInfo::suffix", file_path);
var result = guiInterface("QFileInfo::completeSuffix", file_path);
var result = guiInterface("QFileInfo::fileName", file_path);
var result = guiInterface("QFileInfo::size", file_path);
¶ Scripting interface
Ottieni il tempo di esecuzione javascript.
var timeCount = guiInterface("QTime::elapsed", file_path);
¶ sistema di interfaccie
Usato per sapere le informazioni di sistema o per ricevere traduzioni in javascript.
guiInterface("system::sleep", seconds);
var kbFree = guiInterface("system::drivefree");
var usbPath = guiInterface("system::usbdrive");
var usbKbFree = guiInterface("system::usbdrivefree");
var sdPath = guiInterface("system::sddrive");
var sdKbFree = guiInterface("system::sddrivefree");
var flashKbFree = guiInterface("system::freespace");
var translation = guiInterface("system::linguistic", default_code, lang);
¶ messaggi del interfaccia
Messaggi pop-up sullo schermo, per l'utente.
Nota: questo codice non funzionerà nelle pagine DIALOG.
//popup with error message style
guiInterface("gui::show_error", title, text);

//popup with javascript alert style
guiInterface("gui::messageBox", title, text);

//popup with javascript confirm style
guiInterface(
  "gui::messageBox",
  title,
  text,
  buttons[(messageBoxNo, messageBoxYes, messageBoxOk, messageBoxCancel)]
);
ESEMPIO:
var result = guiInterface("gui::messageBox", "WARNING", "Delete file?", messageBoxNo|messageBoxYes);`
if(result == messageBoxYes)
{
  //do something for the confirm
}
else
{
  // do something else...
}
¶ chiamata del interfaccia
La call interface viene usata per fare il setup dei widget tramite codice. Viene usata per QComboBox, QListWidget e QTabWidget (per creare un foglio di calcolo ed visualzzare la tabella ).
//Drop into form a QComboBox, with name "combobox"...
guiInterface("call::combobox::addItem", text);
guiInterface("`call::combobox::addIconText", path\_of\_image, text);
var itemNumber = guiInterface("call::combobox::count");
var index = guiInterface("call::combobox::currentIndex");
var text = guiInterface("call::combobox::itemText", index);
guiInterface("call::combobox::setCurrentIndex", index);
guiInterface("call::combobox::setFontSize", index, size);

//Drop into form a QListWidget, with name "listWidget"...
guiInterface("call::listWidget::addItem", text);
var itemNumber = guiInterface("call::listWidget::count");
var index = guiInterface("call::listWidget::currentRow");
var item = guiInterface("call::listWidget::item", index);
guiInterface("call::listWidget::setCurrentRow", index);
guiInterface("call::listWidget::setFontSize", index, size);

//Drop into form a QTabWidget, with name "tabWidget"...
//calling interface to setup a spreadsheet table.
guiInterface("call::tabWidget::setupTabs", [Tab names], [Header values])
guiInterface("call::tabWidget::clear");
guiInterface("call::tabWidget::addItem", [array of values]);
guiInterface("call::tabWidget::count");
var index = guiInterface("call::tabWidget::selected");
var row = guiInterface("call::tabWidget::getItem", index);
guiInterface("call::tabWidget::removeItem", index);

//Drop into form a QTableWidget, with name "tableWidget"...
//after beginUpdate execute all the operations at once.
guiInterface("call::tableWidget::beginUpdate");

//commit of operations
guiInterface("call::tableWidget::endUpdate");

//get the rectangle to paint cell editing, then call the inputcontext method to show the keyboard and set the callback function
var itemRect =guiInterface("call::tableWidget::visualItemRect", row, column);
guiInterface("inputcontext", "BOOL", value, "the_callback_function", rect);
guiInterface("call::tableWidget::setHorizontalHeaderLabels, {"label1", "label2"});
guiInterface("call::tableWidget::setVerticalHeaderLabels, {"label1", "label2"});
guiInterface("call::tableWidget::setVerticalHeaderWidth, value);
guiInterface("call::tableWidget::setColumnWidth, column, value);
guiInterface("call::tableWidget::setRowHeigth, row, value);
var rowIndex = guiInterface("call::tabWidget::currentIndex");
var rowIndex = guiInterface("call::tabWidget::currentRow");
guiInterface("call::tabWidget::setCurrentRow", rowIndex);
var columnIndex = guiInterface("call::tabWidget::currentColumn");
guiInterface("call::tabWidget::setCurrentColumn", columnIndex);

//add a item cell, cellItem contain row and column indexes.
guiInterface("call::tabWidget::addItem", cellItem);
var item =guiInterface("call::tabWidget::getItem", row, column);
guiInterface("call::tabWidget::removeRow", rowIndex);

//clear all table data
guiInterface("call::tableWidget::clear");
See the example of "**Table management**" for tabWidget use.
¶ QTableView interfaccia
Usato per gestire una QTableView, in modo da mostrare dati a schermo.
//mandatory to used the tableView via javascript
//register a callback to get cell data from list
//Connect dataList to tableView
guiInterface("qtableview::tableView", "register_callback", "getTableItem");
guiInterface("qtableview::tableView", "setRowCount", number);
guiInterface("qtableview::tableView", "setcolcount", number);
guiInterface("qtableview::tableView", "setrowsheight", number);
guiInterface("qtableview::tableView", "setcolswidth", number);
guiInterface("qtableview::tableView", "setrowheight", number);
guiInterface("qtableview::tableView", "setcolwidth", number);
guiInterface("qtableview::tableView", "currentcellinfo");
guiInterface("qtableview::tableView", "updatecell", row, col);
guiInterface(
  "qtableview::tableView",
  "setverticalheaderlabels",
  array_of_labels
);
guiInterface(
  "qtableview::tableView",
  "sethorizontalheaderlabels",
  array_of_labels
);
guiInterface("qtableview::tableView", "repaint");
guiInterface("qtableview::tableView", "setcurrentcell", row, col);
guiInterface("qtableview::tableView", "editpending");
guiInterface("qtableview::tableView", "visualitemrect", row, col);
vedi esempio QTableView per usarlo.
¶ Trovare widgets nella pagina
A volte è necessario trovare un widget o un gruppo di widget.
Per esempio può essere usato per trovare pulsanti o etichette di una pagina inclusa: il javascript editor del modulo principale non conosceva il nome del widget, quindi può essere trovato.
Per questo il metodo findChild può aiutare il programmatore.
Controlla se il modulo è caricato e poi cerca il widget.
if (form != null) {
  if (form.findChild("WIDGET_NAME") != null) {
    var theWidget = form.findChild("WIDGET_NAME");
    //do somethig with the retrieved widget
  }
}
¶ 4. Creazione di un interfaccia utente
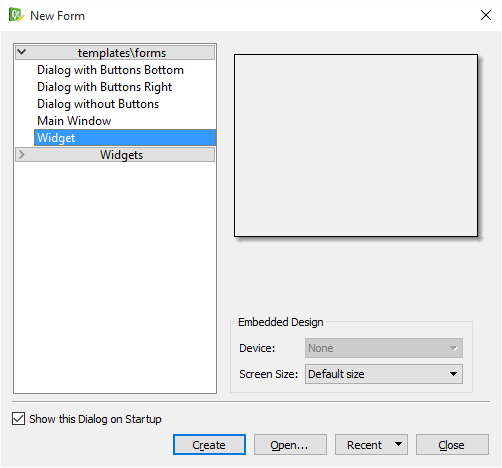
Dopo aver aperto un progetto, aggiungi moduli di interfaccia utente per controllare lo stato del PLC. Per creare moduli premi il pulsante "NEW" sulla barra. Una finestra di dialogo apparirà. Poi seleziona "widget" e premi create. Un nuovo modulo verrà creato.
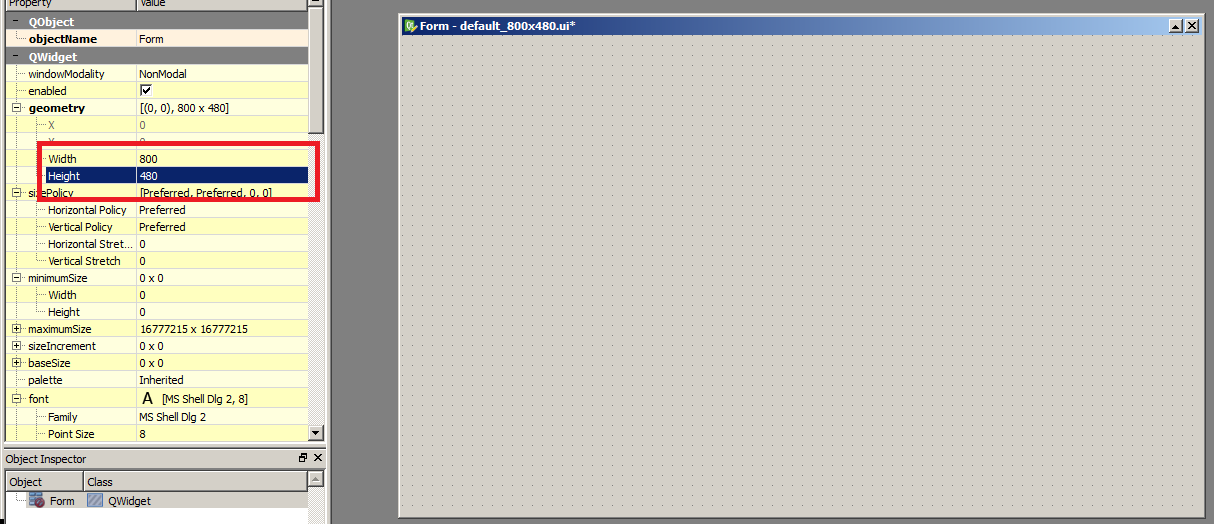
Ora cambia le dimensioni delle pagine per riempire gli schermi 800x480 del PLC Sirius-ES (small size)
Il designing del modulo è semplice, fai drag & drop dei componenti al suo interno. I widget possono essere usati come contenitori per gruppi di componenti (come pannelli interni).
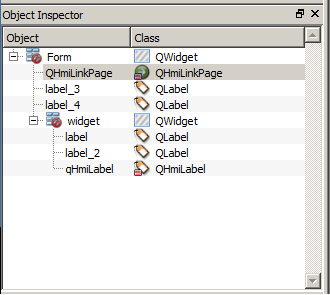
Nel pannello Object inspector, la gerarchia dei widget del modulo viene mostrata.
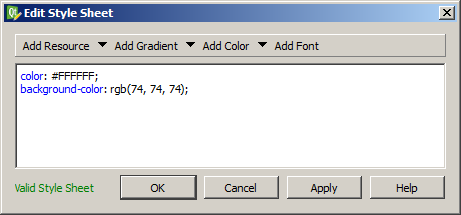
Gli stili possono essere modificato con le style sheets, right click sul componente per personalizzarlo e premi “Change styleSheet...”. Una finestra con lo stile corrente apparirà (la prima volta sarà vuoto). Scrivi lo stile, come CSS nelle pagine HTML e applicalo.
Uno stile può essere definito per il modulo principale e si estende a tutti i componenti, può essere specifico di una famiglia di componenti. Lo stile può anche essere specificato per un singolo componente usando il suo nome con il prefisso #, o per una famiglia di componenti usando il suo tipo.
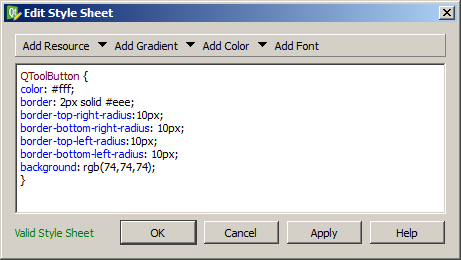
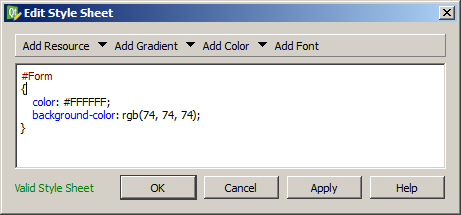
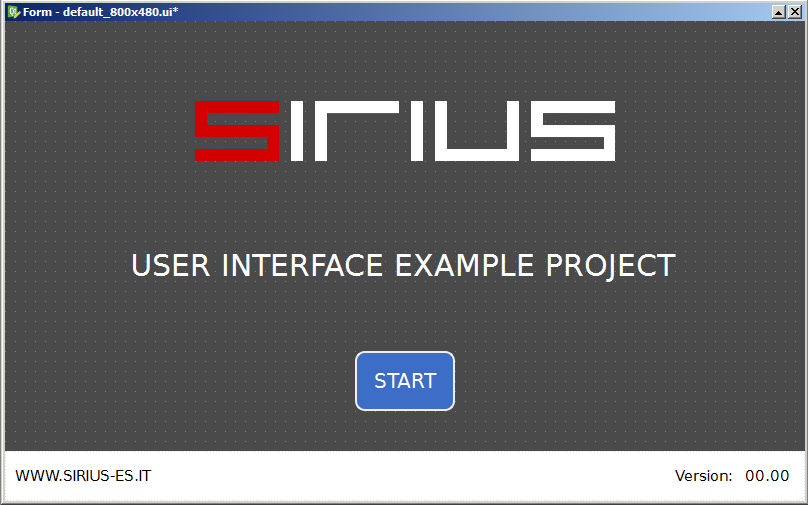
Dopo aver scritto o incollato uno stile CSS, premi OK o APPLY per mostrare il risultato (in questo caso, sul pulsante "Set Variable".
¶ multi linguaggio
Le traduzioni sono situate nel file in formato cvs "Linguistic.txt" Contiene etichette di traduzione, e traduzioni definite dall'utente. E' un file in formato csv, con il carattere "TAB" come separatore.
Una custom box viene creata per gestire traduzioni dal Qt Designer. Permette all'utente di creare/cancellare/cercare e salvare traduzioni nel file "Linguistic.txt".
Il sistema controlla se il testo del widget è impostato come language key nella tabella. Se viene trovato, la traduzione per il linguaggio di sistema viene caricata. Se non viene trovato, l'etichetta del widget non cambierà.

L'utente può selezionare le proprie traduzioni aggiungendo una riga nella tabella o modificando direttamente il file. Un modo semplice per aggiungere traduzioni è right click su un widget, e selezionare “Add widget to Translation database”.
Il testo del widget viene impostato come keyword, poi si può scrivere la propria traduzione.
Per semplificare l'editing delle traduzioni, o per impostare una traduzione massiccia di druppi di etichette, il file può essere aperto con qualsiasi programma di foglio elettronico come MS Excel o OpenOffice.
Una volta che il file è stato modificato, salvalo e ricarica il Qt Designer con nuove traduzioni.
¶ connessione delle variabili al interfaccia del PLC .
una volta definita interfaccia utente , è tempo di connettere il PLC .
con Sirius-ES competenti personalizzati è veramente semplice ; doppio click su un nome della variabile per ordine , per copiare negli appunti ed incollare widget “fieldName” proprietario.
nel esempio in basso la versione con campo di valore è QHmiLabel , un Qt Label ridefinito dalla Sirius-ES. riempi il campo con il nome della variabile , ed al momento del esecuzione sostiture il valore con quello letto dal PLC.
in caso di ingressi da campi o bottoni , il valore può essere scritto/letto a seconda della modalità .
con tutti i Sirius-ES widgets che hanno la proprietà fieldName, è possibile trascinare ed rilasciare la variabile .
il trascinamento della variabile è un modo facile per impostare proprietà del fieldName .
la stessa operazione può essere fatta con QHmiLinkButton. trascinando la pagina di destinazione sul widget creerà un collegamento.
¶ allarmi ed gestioni pericoli
interfaccia utente può essere configurata per mostrare allarmi ed avvisi per il monitoraggio stato del PLC .
gli allarmi possono essere mostrati in una tabella oppure un popup è stata associata una variabile impostata su acceso.
trascina il wideget verso la scheda; poi trascina le variabili allarme devono essere di tipo BOOL.
il widget legge un file alarm.xml; the alarms.xml ,il file in questo formato :
<?xml version="1.0" encoding="utf-8"?>
  <Alarms>
    <Alarm name="CONF1_ALARMEXAMPLE" auto_remove="false" popup="true" log="false" table="false" text="ALARM TITLE\nTHIS IS THE ALARM MESSAGE" stylesheet="background-color: rgb(255, 0, 0);"/>
  </Alarms>             `
per aggingere le variabili di allarme cliccare l' editor di proprietà ed poi clicca "Change string list". aggiungi il doppio click dentro al widget per aprire finestra di configurazione.
dentro la pagina , questo componete può essere cablato con gli altri widgets ,per gestire gli allarmi . può essere usato per compilare campi di testo oppure la lista degli allarmi.
la proprietà è data dal ordine dentro il file xml.
il QHmiAlarms widget è stato condiviso per tutti HMI .una volta inserito, gli allarmi possono essere mostrati in qualsiasi modulo (popup mode).
per mostrare allarme come barra di stato segui questo esempio :
crea una pagina e rilascialo verso QHmiLinkPage ed QHmiAlarms .
conmetti dal segnale QHmiAlarms firstactiveAlarm(QString) to QHmiLinkPage slot setButtonText(QString)
verso le proprietà QHmiAlarms, imposta PasswordLevel da 999 ed Hide per vero , in ordine per fare il widget invisibile .
imposta destinationPage per QHmiLinkButton per la pagina di allarme .
quando un allarme è attivia , il bottone di collegamento mostra allarme attivo . Facendo clic su di esso, viene visualizzata la tabella completa degli allarmi.
¶ ricette
qui un esempio per creare la pagina ricette. rilascia un QHmiWorkRecipe verso la pagina ed inserisci "cartella", ed un media dalla scheda proprietà.
rilascia 3 QHmiPushButton verso la pagina ed rimpizzare testo con LOAD, SAVE and DELETE
rilasci un QLineEdit,QHmiEdit , per mostrare/ usare la selezione della ricetta filename.
se filename non può essere modificato,rilascia a Qlabel
utente può anche scegliere quali messaggi vuole per connetere i bottoni (da QHmiWorkRecipe properties).
Collegare i pulsanti con il widget delle ricette selezionando il segnale clicked() su ciascun pulsante agli slot loadRecipe(), saveRecipe() e deleteRecipe() per ciascun filo.
Filo da QHmiWorkRecipe aQLineEdit(o altro) per memorizzare il file della ricetta o modificarlo; dal segnale recipeSelected(QString) allo slot setText(QString) sulla destinazione.
DaQLineEditsegnale textEdited(QString) allo slot setRecipeName(QString) per modificare il file selezionato.
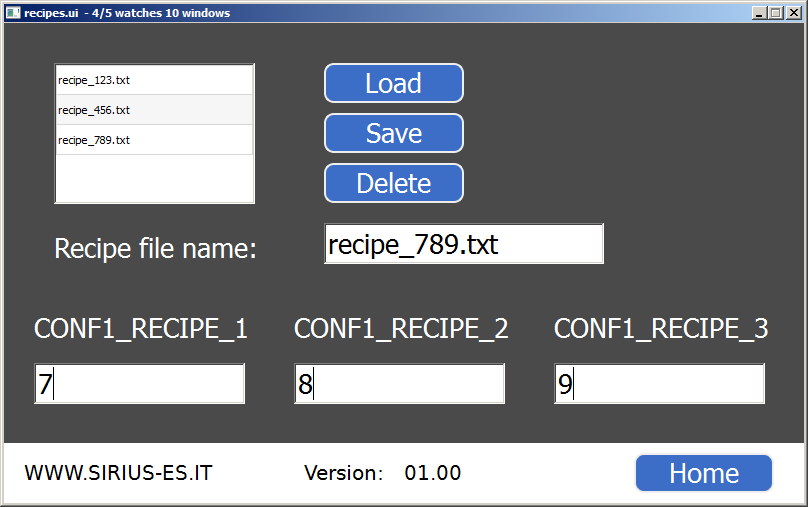
la pagina ricette nel progetto di esempio mostra come funzionano i widget ricette.
è possibile cariare / salvare / cancellare impostando 3 tipi di variabili . ascoltando il bottone della pagina modificando i valori e pressionione salvata sul tasto , la ricetta verrà salvata con il nome specificato nel file.
selezionado una ricetta dalla scatola , selezionadone uno puo essere caricato oppure eliminato.
¶ gestione tabelle
Esistono due modi per gestire i dati in formato tabella: QTableWidget e QTableView.
Il primo utilizza un componente QT con i suoi slot di connessione e javascript; il secondo è migliore per le prestazioni con dati enormi, ma non ha segnali di connessione e funziona solo con codice javascript.
Ogni cella è configurata da javascript con l'oggetto cellData.
var cellData = {
  row: 0,
  col: 0,
  icon: "",
  iconPos: "",
  text: "",
  backGround: "",
  foreGround: "",
};
- row and col are the cell position
- icon is the path of the image to show in cell
- iconPos is the icon position relative to text. Can be right, left, top, bottom
- text is the cell text
- backGround and foreGround are cell colors.Can be in different modes RED, #FF0000, rgb(255,0,0)
¶ QTableWidget
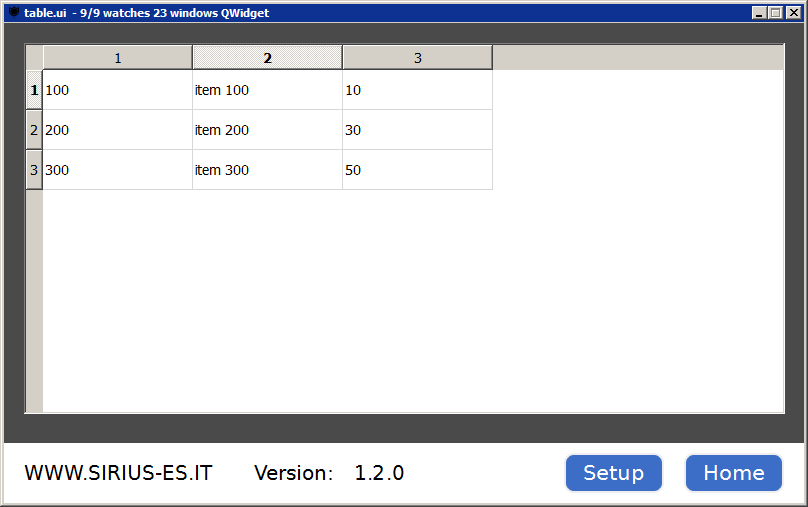
Inserire un QTableWidget nella pagina, quindi modificare il JavaScript per popolarlo e gestire i clic sulle celle.
Se si desidera gestire il clic singolo e doppio sulla cella, creare le variabili cellRow e cellCol.
Quindi creare la funzione cellClicked(row, col) per gestire le celle
var cellRow = -1;
var cellCol = -1;
function cellClicked(row, col) {
  if (cellRow == row && cellCol == col) {
    //second click
    //close cell
    guiInterface("call::tableWidget::setRowHeight", row, 40);
    cellRow = -1;
    cellCol = -1;
    return;
  } else {
    //first click, do something
    //expand cell height to highlight it
    //and close the previous selected
    guiInterface("call::tableWidget::setRowHeight", cellRow, 40);
    guiInterface("call::tableWidget::setRowHeight", row, 150);
  }
  cellRow = row;
  cellCol = col;
}
poi crea delle funzioni per caricare dati e popolare la tabella
var list = [];
function loadData() {
  list = [];
  list[0] = new Object();
  list[0].code = "100";
  list[0].description = "item 100";
  list[0].quantity = "10";
  list[1] = new Object();
  list[1].code = "200";
  list[1].description = "item 200";
  list[1].quantity = "30";
  list[2] = new Object();
  list[2].code = "300";
  list[2].description = "item 300";
  list[2].quantity = "50";
}
function populateTable() {
  guiInterface("call::tableWidget::beginUpdate");
  guiInterface("call::tableWidget::clear");
  guiInterface("call::tableWidget::setRowHeight", 0, 40);
  for (i = 0; i < 3; i++)
    guiInterface("call::tableWidget::setColumnWidth", i, 150);
  for (i = 0; i < list.length; i++) {
    //populate row cells
    var codeCell = {
      row: 0,
      col: 0,
      icon: "",
      iconPos: "",
      text: "",
      width: 0,
      height: 0,
      backGround: "",
      foreGround: "",
    };
    var descrCell = {
      row: 0,
      col: 0,
      icon: "",
      iconPos: "",
      text: "",
      width: 0,
      height: 0,
      backGround: "",
      foreGround: "",
    };
    var qtyCell = {
      row: 0,
      col: 0,
      icon: "",
      iconPos: "",
      text: "",
      width: 0,
      height: 0,
      backGround: "",
      foreGround: "",
    };
    codeCell.row = i;
    codeCell.col = 0;
    codeCell.text = list[i].code;
    descrCell.row = i;
    descrCell.col = 1;
    descrCell.text = list[i].description;
    qtyCell.row = i;
    qtyCell.col = 0;
    qtyCell.text = list[i].quantity;
    guiInterface("call::tableWidget::addItem", codeCell);
    guiInterface("call::tableWidget::addItem", descrCell);
    guiInterface("call::tableWidget::addItem", qtyCell);
  }
  guiInterface("call::tableWidget::endUpdate");
}
connetti la funziona al tableWidget, carica i dati ed riempi la tabella .
function register() {
  loadData();
  populateTable();
  tableWidget["cellClicked(int,int)"].connect(cellClicked);
}
function unregister() {
  tableWidget["cellClicked(int,int)"].disconnect(cellClicked);
}
al momento del esecuzione quando la pagina è caricata puo apparire come questo :
¶ QTableView
il QTableView disegna solo linee video , qundi meglio con un grande ammontare di dati . QTableView non ha segnale per connetersi .
esso mostra solo i dati ; tutta la logica deve essere fatta sul sorgente o strutture dati (ie: sort, add, delete row) poi ricarica la tabella .
var list = [];
var cellRow = -1;
var cellCol = -1;
function loadData() {
  //fill the data structure
}
//call this function when the data structure is modified
function refreshTable() {
  guiInterface("qtableview::tableView", "repaint");
}
//draw the cell
function getTableItem(row, col) {
  var cellData = {
    row: 0,
    col: 0,
    icon: "",
    iconPos: "top",
    text: "",
    backGround: "",
    foreGround: "",
  };
  cellData.row = row;
  cellData.col = col;
  cellData.text = list[row][col];
  return cellData;
}
var columnsWidth = [50, 100, 100, 250, 100];
var columnsHeader = ["a", "b", "c", "d", "e"];
function register() {
  loadData();
  guiInterface("qtableview::tableView", "register_callback", "getTableItem");
  guiInterface("qtableview::tableView", "setRowCount", list.length);
  guiInterface("qtableview::tableView", "setColCount", columnsHeader.length);
  guiInterface("qtableview::tableView", "setRowsHeight", 25);
  guiInterface(
    "qtableview::tableView",
    "sethorizontalheaderlabels",
    columnsHeader
  );
  for (i = 0; i < columnsWidth.length; i++)
    guiInterface("qtableview::tableView", "setColWidth", i, columnsWidth[i]);
}
Per modificare il testo delle celle, la funzione timer controlla quale operazione viene eseguita sulle celle, per espanderle o modificarle.
function timer() {
  var cellData = guiInterface("qtableview::tableView", "currentCellInfo");
  //first click, expand selected cell height
  if (cellData.row != cellRow) {
    if (cellRow >= 0)
      guiInterface("qtableview::tableView", "setRowHeight", cellRow, 25);
    guiInterface("qtableview::tableView", "setRowHeight", cellData.row, 100);
    cellRow = cellData.row;
  }
  if (cellData.col != cellCol) {
    cellCol = cellData.col;
  }
  var editPending = guiInterface("qtableview::tableView", "editPending");
  if (editPending.x != -1) {
    var rect = guiInterface(
      "qtableview::tableView",
      "visualRect",
      editPending.x,
      editPending.y
    );
    //open keyboard or do something with the cell
    guiInterface("inputcontext", "string", cellData.text, "cellEdited", rect);
  }
}
Una volta chiusa la tastiera, verrà eseguita una callBack cellEdited, per gestire i nuovi dati.
function cellEdited(value) {
  list[cellRow][cellCol] = value;
  guiInterface("qtableview::tableView", "repaint");
}
Dialog popup
tutte le interfaccie grafiche sono mostrate a schermo intero. per mostrare una finstra pop up o dialogo popup deve essere creato.
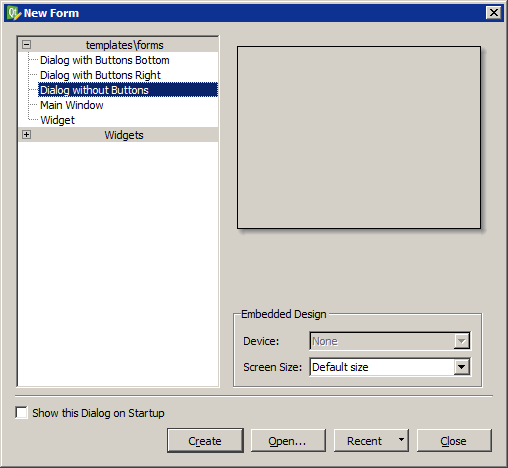
Fare clic sul pulsante Nuovo e selezionare Dialogo senza pulsanti, quindi premere Crea. Gli altri tipi di dialogo non funzionano bene, quindi non utilizzarli.

Nel modulo padre aggiungere un pulsante di collegamento per aprire la finestra di dialogo o un pulsante strumento collegato alla funzione javascript che imposta i parametri e la apre.
function openClicked() {
  guiInterface("setglobal", "parameterName", "parameterValue");
  guiInterface("system::linkPage", "dialog.ui");
}

function register(path) {
  btnOpen["clicked(bool)"].connect(openClicked);
}

function unregister(path) {
  btnOpen["clicked(bool)"].disconnect(openClicked);
}
per inviare dati verso modulo genitore , i valori devono essere settati come variabile globale , perchè non cè una comunicazione diretta tra el due pagine .
quando il dialogo è chiuso il genitore verrà ricaricato .
Save the parent data before invoke the dialog. Unsaved data (setglobal) will be lost!
Aggiungere due QToolButton per avere la funzionalità OK/Annulla.
Collegarli tramite javascript con due funzioni per gestire l'evento click dei pulsanti.
function okClicked()
{
}

function cancelClicked()
{
}

function register(path)
{
  btnOk["clicked(bool)"].connect(okClicked);
  btnCancel["clicked(bool)"].connect(cancelClicked);
  var parameter =`guiInterface("getglobal", "parameterName");
}

function unregister(path)
{
  btnOk["clicked(bool)"].disconnect(okClicked);
  btnCancel["clicked(bool)"].disconnect(cancelClicked);
}
Quindi inserire tutti i widget necessari per la progettazione della pagina, come comboBox o campi di testo.
La funzione cancelClicked è un semplice ricaricamento del form padre .
La funzione okClicked può avere il codice da eseguire e può impostare i parametri per riportare il form padre.
function okClicked() {
  guiInterface("setglobal", "dialogAction", "OK");
  guiInterface("setglobal", "dialogValue", "the_result_value");
  guiInterface("system::linkPage", "");
}

function cancelClicked() {
  guiInterface("system::linkPage", "");
}
nel genitore formregister function, i dati dei risultati possono essere gestiti.
function register(path) {
  btnOpen["clicked(bool)"].connect(openClicked);
  var dialogAction = guiInterface("getglobal", "dialogAction");
  if (dialogAction == "OK") {
    // here the callback code
    var dialogValue = guiInterface("getglobal", "dialgValue");
    guiInterface("gui::messageBox", "Warning", dialogValue);
    guiInterface("removeglobal", "dialogAction");
    guiInterface("removeglobal", "dialogAction");
  }
}
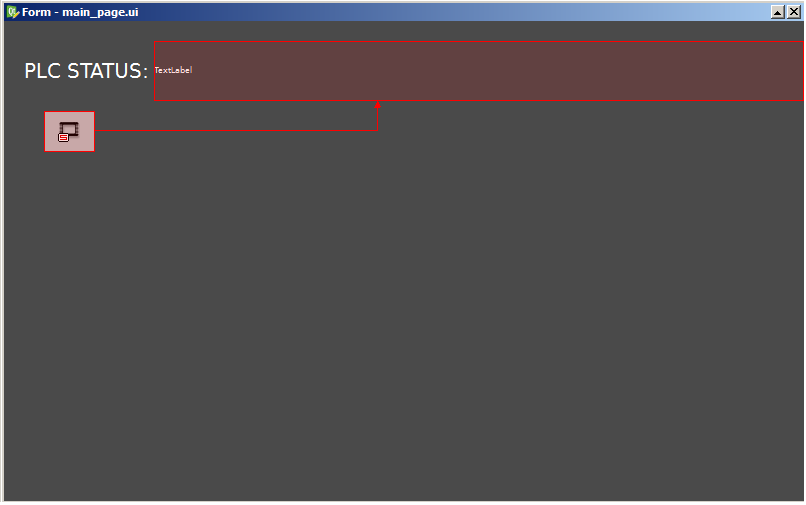
¶ gestione stati PLC
il mopnitoraggio dello stato del PLC,Sirius-ES ha sviluppato un componete per monitoraggio stato delle variabili.
la lista delle variabili è scritta nel file xml chamato status.xml.
<?xml version="1.0" encoding="windows-1250"?>
  <PlcStatus>
    <Variable name="VARIABLE_NAME_1" text="MESSAGE TEXT 1"></Variable>
    <Variable name="VARIABLE_NAME_2" text="MESSAGE TEXT 2"></Variable>
  </PlcStatus>`
Il componente personalizzato QHmiPlcStatus legge questo file e scrive sulla sua “destinazione” se il testo della variabile è impostato su TRUE. L'ordine di priorità è lo stesso del file. Ciò significa che la VARIABILE_NOME_1 viene visualizzata prima della VARIABILE_NOME_2 se sono impostate contemporaneamente.
Collegare QHmiPlcStatus a un altro componente (come QLabel) per visualizzare il testo di stato.
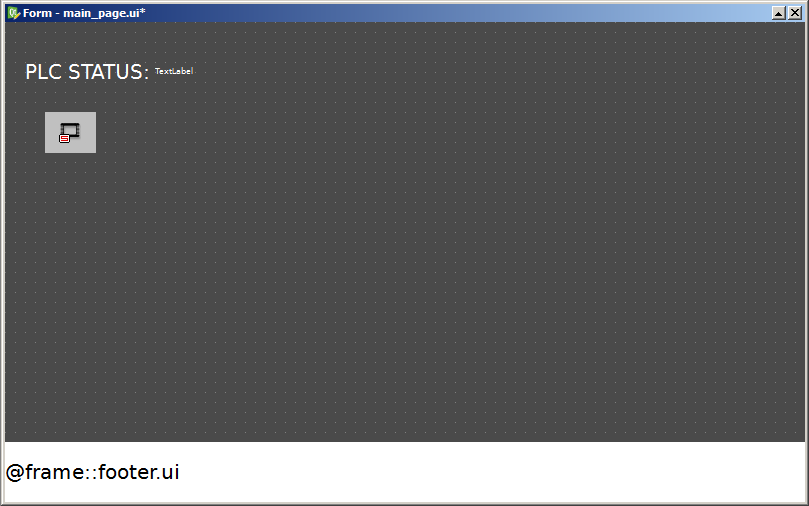
durante il momento della esecuzione, quando una variabile contenuta nel file xml è settata su vero ,“TextLabel” mostra i messaggi.
¶ pagina inclusa
Le pagine possono essere incluse in altre pagine, utilizzando la parola chiave “@frame::”.
Inserire un componente QLabel nella pagina e impostare il testo “@frame::pageToInclude.ui”.
**AVVERTENZA:**il javascript del file incluso NON VIENE ESEGUITO. Viene eseguito solo il javascript della pagina principale. Vedere l'esempio successivo per lavorare con il javascript nei frame inclusi.

¶ Javascript tra le pagine
L'inclusione di file in altri può essere utile per creare parti comuni come intestazioni e barre degli strumenti.
Ma non possono avere javascript. Per utilizzare i javascript sui propri widget, questi devono trovarsi nella pagina.
Utilizzare nomi unici per i widget inclusi, in modo da non avere conflitti con altri widget nella pagina principale.
Se la pagina inclusa è in TUTTE le pagine (come intestazioni o piè di pagina), il codice può essere scritto nel file system.js. Questo file funziona in tutte le pagine dell'applicazione.
Nell'esempio nel file incluso (IE: una testata) un led cambia il suo colore leggendo una variabile:
var isReady = false;
function register(path) {
  guiInterface("vars::add_variable", "VAR_NAME");
}

function timer() {
  //if is not ready, the variabale can not be read from javascript
  if (!isReady) return;

  if (form != null) {
    if (form.findChild("labelLedStatus") != null) {
      var value = guiInterface("vars::number_value_read", "VAR_NAME");
      if (value == 2) {
        form.findChild("`labelLedStatus`").styleSheet =
          "background-image: url('../res/leds/led_green.png'); " +
          "background-position: center;" +
          "background-repeat: no-repeat;";
      } else if (value == 1) {
        form.findChild("`labelLedStatus`").styleSheet =
          "background-image: url('../res/leds/led_yellow.png'); " +
          "background-position: center;" +
          "background-repeat: no-repeat;";
      } else {
        form.findChild("`labelLedStatus`").styleSheet =
          "background-image: url('../res/leds/led_red.png'); " +
          "background-position: center;" +
          "background-repeat: no-repeat;";
      }
    }
  }
}

function values_changed(vars, changed) {
  isReady = true;
}
¶ etichette multi linea
Se è necessario mostrare un messaggio con un indice, questo è un modo possibile per mostrarlo. In questo modo è possibile mostrare i messaggi senza il layout della comboBox Arrow e impostare uno stile per il messaggio dell'etichetta con javascript.
Trascinare una QHmiComboBox e una QLabel nel form. Quindi collegarli da combo**currentIndexChanged(QString)**a label setText(QString). Quando il valore della combo cambia, cambia anche l'etichetta.
Impostare la proprietà fieldName per comboBox, quindi fare clic con il pulsante destro del mouse sul widget e selezionare Edit Items...
Inserire gli elementi da mostrare (traducibili) e premere ok.
Ora fare nuovamente clic con il pulsante destro del mouse e selezionare Modifica javascript... nella funzione di registro scrivere:
function register(path) {
  label.Text = qHmiComboBox.currentText;
  qHmiComboBox.visible = false;
}
la prima volta la combo non sta cmabiando ! il codice forza l etichetta e nasconde la combo .
¶ Inizializzazione delle variabili della pagina
Se l'inizializzazione delle variabili è necessaria al caricamento della pagina, non è possibile impostare le variabili direttamente nella funzione di registro.
- Quando la pagina viene caricata, la funzione register viene chiamata dal sistema.
- Poi comunica al PLC quali variabili sono state richieste dal codice javascript ma non hanno alcun valore.
- La risposta del PLC contiene i valori attuali delle variabili richieste.
- La funzione values_changed viene richiamata quando i valori vengono caricati
- Ora le variabili sono accessibili dal codice
Per inizializzare le variabili al primo avvio, ecco un esempio:
var firstTime = true;

function register(path) {
  guiInterface("vars::add_variable", "VARIABLE_NAME");
}

function values_changed(vars, changed) {
  if (firstTime) {
    //write init value
    guiInterface("vars::string_value_write", "VARIABLE_NAME", stringValue);
    firstTime = false;
    //now this code is not execute on next value_changed call
  }
}
¶ Cambiare stile al cambio di variabile
Quando una variabile cambia valore, un campo può assumere un aspetto diverso per visualizzare uno stato.
È possibile utilizzare qualsiasi tipo di dato.
Registrare la variabile nella funzione register per poterla utilizzare nella pagina.
Nella funzione values_changed verificare se la variabile è stata modificata e controllare il suo valore.
Fare qualcosa con il valore specificato.
NOTA: quando la pagina viene caricata, tutte le variabili vengono modificate perché il loro valore iniziale è "undefined ".
NOTA: se la variabile viene testata dall'array changed, tutti i valori sono STRING.
Se è necessario il tipo reale, utilizzareguiInterface("vars::xxx_value_read", "VARIABLE") ;
function register(path) {
  //register the variable to test`
  guiInterface("vars::add_variable", "VARIABLE_TO_TEST");
}

function values_changed(vars, changed) {
  //check if variable is changed
  if (typeof changed["VARIABLE_TO_TEST"] != "undefined") {
    //check the value and do something
    if (changed["`VARIABLE_TO_TEST`"] == "TRUE")
      widgetToChange.styleSheet = "background-color: rgb(0, 255, 0);";
    else widgetToChange.styleSheet = "background-color: rgb(255, 0, 0);";
  }
}
¶ gestione dei file
le operazioni su file sono più semplici in javascipt poi in nel codice del PLC.
I dati possono essere caricati e salvati in un file javascript e passati al PLC per eseguire il suo codice.
Ogni file da gestire deve essere registrato con la funzioneQFile::register. Una volta terminato, il file deve essere disregistrato conQFile::unregister
Per caricare o cancellare un file, prima di aprirlo, verificare se esiste conQFile::exists
if (guiInterface("QFile::exists", FILE_FULL_PATH)) {
  var fd = guiInterface("QFile::register", FILE_FULL_PATH);
  //execute the file operations
  guiInterface("QFile::unregister", fd);
}
dopo questo il file può essere aperto in lettura o scrittura
//read file
var fd = guiInterface("QFile::register", FILE_FULL_PATH);
var result = guiInterface("QFile::open", fd, ReadOnly);
if (result == 1) {
  while (guiInterface("QFile::atEnd", fd) == false) {
    var readLine = guiInterface("QFile::readLine", fd);
    //do something...
  }
  guiInterface("QFile::close", fd);
}
guiInterface("QFile::unregister", fd);

//write file
var fd = guiInterface("QFile::register", FILE_FULL_PATH);
var result = guiInterface("QFile::open", fd, WriteOnly | Truncate);
if (result == 1) {
  //write the file content
  guiInterface("QFile::writeLine", fd, content);
  guiInterface("QFile::close", fd);
}
guiInterface("QFile::unregister", fd);

//append to file
var fd = guiInterface("QFile::register", FILE_FULL_PATH);
var result = guiInterface("QFile::open", fd, WriteOnly | Append);
if (result == 1) {
  //append a row
  guiInterface("QFile::writeLine", fd, rowToAppend);
  guiInterface("QFile::close", fd);
}
guiInterface("QFile::unregister", fd);
i file possono essere cancellati allo stesso modo
if (guiInterface("QFile::exists", `FILE\_FULL\_PATH`)) {
  var fd = guiInterface("QFile::register", FILE_FULL_PATH);
  guiInterface("QFile::remove", fd);
  guiInterface("QFile::unregister", fd);
}
¶ verfica per chiavette USB
le operazioni sui file possono essere fatte con la memeria interna oppure tramite dispositivi USB.
prima di accedere alla usb verfica se è stata montata dal sistema.
questa operazione può essere fatta dalla funzione timer ,per aggiornare periodicamente lo stato USB.
Nell'esempio, il led A diventa verde se è presente un dispositivo USB e diventa rosso in caso contrario.
function timer() {
  var usb = guiInterface("system::usbdrive") == "" ? false : true;
  if (usb) label.styleSheet = "background-image: url('../res/LED_GREEN.png');";
  else label.styleSheet = "background-image: url('../res/LED_RED.png');";
}
¶ creare led sullo schermo
Per visualizzare graficamente un valore booleano sullo schermo, è possibile mostrarlo come un led.
Può essere solo ON-OFF o con due colori diversi (VERDE=ON, ROSSO=OFF) per mostrare lo stato della variabile.
Si può fare in due modi:
- With different images
- Changing background color
¶ con immagini differenti
Trascinare un QHmiButton nella pagina e associarlo alla variabile booleana da mostrare.
Deselezionate la proprietà enabled nella sezione Qwidget.
Nella sezione QAbstractButton scegliere un'immagine nelle proprietà Nornal ON e Normal OFF
Fare lo stesso per le proprietà Disable ON e Disable OFF con le stesse immagini
Impostare le dimensioni dell'immagine in iconSize->Width eiconSize->Heigth
Impostare questo foglio di stile CSS sul pulsante (fare clic sul pulsante e selezionare Change styleSheet...).
QHmiButton {
  border: none;
  background: transparent;
  padding: 0;
}

QHmiButton:pressed {
  border: none;
  background: transparent;
  padding: 0;
}

QHmiButton:checked {
  border: none;
  background: transparent;
  padding: 0;
}
This code can be applied to the buttons parent. Remenber that ALL QHmiButton in the parent hinerit this style.
¶ cambiare il colore dello sfondo
trascinare un QHmiButton nella pagina e associalo a una variabile boleana , ne avrai bisogno per mostrarlo.
Deselezionare la proprietà enabled nella sezione Qwidget.
imposta questo foglio di stile in cascata sul bottone( tasto destro sul bottone ed seleziona Change styleSheet... )
QHmiButton {
  border: none;
  background-color: rgb(0, 255, 0);
  padding: 0;`
}

QHmiButton:checked {
  border: none;
  background-color: rgb(255, 0, 0);
  padding: 0;
}